GSM Hacker
编译GNUARM以及OsmocomBB环境
以下所有操作基于Ubuntu Linux下,所以基于Ubuntu、Debian等Linux版本均可使用。
一、以Root权限进行接下来的所有操作:
$ sudo -s
二、安装编译osmocomBB所需的软件包:
$ aptitude install libtool shtool autoconf git-core pkg-config make gcc
三、下载所需要的GnuARM ToolChain
基于x86架构
 $ wget http://gnuarm.com/bu-2.15_gcc-3.4.3-c-c++-java_nl-1.12.0_gi-6.1.tar.bz2
 $ tar xf bu-2.15_gcc-3.4.3-c-c++-java_nl-1.12.0_gi-6.1.tar.bz2
 $ mv gnuarm-* ~/gnuarm
基于64位架构
 $ wget http://www.gnuarm.com/bu-2.16.1_gcc-4.0.2-c-c++_nl-1.14.0_gi-6.4_x86-64.tar.bz2 百度网盘
 $ tar xf bu-2.16.1_gcc-4.0.2-c-c++_nl-1.14.0_gi-6.4_x86-64.tar.bz2
 $ mv gnuarm-* ~/gnuarm
这样子就已经完成了关于OsmocomBB的交叉编译环境的搭建,剩下就是最关键的设置环境变量
$ export PATH=~/gnuarm/bin:$PATH
建议是直接编辑~/.bashrc的内容,把上面的这个段话直接加到最后。
四、编译libosmocore:
 $ git clone git://git.osmocom.org/libosmocore.git
 $ cd libosmocore/
 $ autoreconf -i
 $ ./configure
 $ make
 $ make install
 $ cd ..
 $ ldconfig
ldconfig命令一定不要忘记执行,否则osmocomBB编译后运行时会出现找不到libosmocore.so.4的错误。
五、编译OsmocomBB:
 $ git clone git://git.osmocom.org/osmocom-bb.git
 $ cd osmocom-bb
 $ git checkout --track origin/luca/gsmmap
 $ cd src
 $ make
基本上已经完成所有的编译操作了!
连接线与TTL的接法
黑/黄:GND
红:TX
白:RX
首先在第一个窗口中输入
cd ~/osmocom-bb/src/host/osmocon/
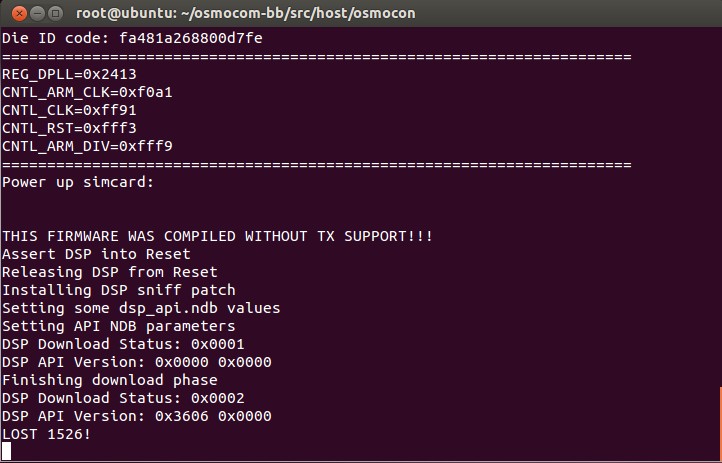
启动osmocon刷写所需要的固件,通常大家都是直接刷写Layer1的固件。
./osmocon -m c123xor -p /dev/ttyUSB0 ../../target/firmware/board/compal_e88/layer1.compalram.bin
然后按一下手机的开关键,就会发现命令行窗口中源源不断地蹦出如下字符,手机也有了显示。
第二步,扫描查找附近的基站,第二个窗口输入
cd ~/osmocom-bb/src/host/layer23/src/misc/
./cell_log -O
就会发现源源不断地有附近的基站信息输出了,包含了其运营商名称。
第三步,对指定信道号进行嗅探
我们需要知道自己手机目前连接基站的ARFCN,一般手机都有工程模式,以iPhone为例,在拨号键盘输入:
*3001#12345#*
进入工程模式后,选择GSM Cell Environment->GSM Cell Info->GSM Serving Cell,就可以看到目前手机连接的基站ARFCN值了,应该在第二步中,也能看到这个ID存在。其他手机的命令
Samsung (Android): *#*#197328640#*#* or *#0011#
iPhone (all): *3001#12345#*
HTC (Android): *#*#7262626#*#*
把THE_ATFCN_ID换成你查到的手机正在使用的ID
cd ~/osmocom-bb/src/host/layer23/src/misc/
./ccch_scan -i 127.0.0.1 -a THE_ARFCN_ID
第四步,使用wireshark进行本地抓包,这时候的GSM协议已经被封装上了TCP-IP,可以在本地用wireshark抓到。
wireshark -k -i lo -f 'port 4729'
筛选一下,选择gsm_sms,你就会在wireshark上看到了。
附:
扫描基站
~/cell_logger/osmocom-bb/src/host/layer23/src/misc/cell_log -O
扫描某一条线路,例如30
~/cell_logger/osmocom-bb/src/host/layer23/src/misc/ccch_scan -i 127.0.0.1 -a 30
将扫描基站的日志保存到本地
dumpcap -i lo -w ~/cell_logger/mobilelog/Cell.log
打开WireShark实时读取相关的信息
sudo wireshark -k -i lo -f 'port 4729'
多机连接的情况下进行监听,只需重复刷机操作后,查看cell_log的扫描结果,输入ccch_scan针对单一基站的扫描命令
~/cell_logger/osmocom-bb/src/host/layer23/src/misc/ccch_scan -i 127.0.0.1 -a 116
这样子第二台就会显示ccch_scan的结果了!多机监听就是这么简单,操作就是如此类推下去。


GSM Hacker:等您坐沙发呢!